A dual axis joystick is very important in projects involving control of robots and RC devices using various microcontrollers for example Arduino. The joystick am using in this tutorial is similar to the analog joysticks on PS2 controllers.
Dual Axis Joystick hardware overview.
The major purpose of this joystick is to control movement in two directions, that is , the horizontal (x-axis) and vertical (y-axis) directions.This is made possible by mounting two 10kΩ potentiometers at a 90 degrees angle. The potentiometers are connected to a short stick centered by springs.

These potentiometers are used as dual adjustable voltage dividers, providing 2-Axis analog input in a control stick form. When at rest,the potentiometers give 2.5V for both X and Y. Moving the joystick will cause the output to vary from 0v to 5V depending on its direction.
The Arduino microcontroller has ADC resolution of 10 bits. Hence the values on each analog channel can vary from 0 to 1023. At rest you can expect to read a value of around 512.
Connecting the Dual Axis Joystick to Arduino.
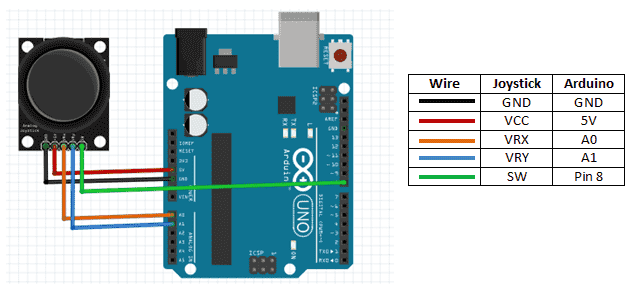
The components are connected as shown in the figure below. +5V pin is connected to the 5V power supply, GND pin is connected to the GND, the VRx and VRy pins are connected to the analog input pins and the SW pin is connected to the digital I/O pin.
const int SW_pin = 8; // digital pin8 connected to switch output
const int X_pin = 0; // analog pin connected to X output
const int Y_pin = 1; // analog pin connected to Y output
void setup() {
  pinMode(SW_pin, INPUT);
  digitalWrite(SW_pin, HIGH);
  Serial.begin(9600);
}
void loop() {
  Serial.print("Switch:  ");
  Serial.print(digitalRead(SW_pin));
  Serial.print(" | ");
  Serial.print("X-axis: ");
  Serial.print(analogRead(X_pin));
  Serial.print(" | ");
  Serial.print("Y-axis: ");
  Serial.print(analogRead(Y_pin));
  Serial.println(" | ");
  delay(200);
}When the above code is uploaded to the Arduino, from the serial monitor we can be able to see the X and Y analog values for the different positions of movement of the joystick.
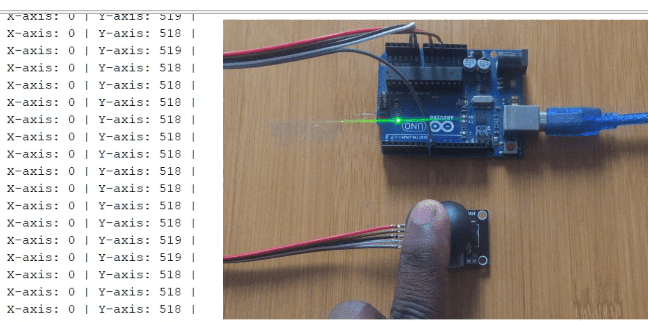
This gives the basic idea of how the dual axis joystick functions and will be the starting point for a number of applications. Am going to use two more examples to show how this idea can be extended to animation graphics using Processing IDE and an 8X8 Led matrix
Using Processing IDE.
We can use the Processing IDE to create a simple graphic display that can be controlled by the joystick. We are going to move a white dot across a black background.
First we will program our Arduino to create values of x-axis, y-axis and button state on the serial port.
Code for Arduino.
int xValue = 0 ; // read value of the X axis
int yValue = 0 ; // read value of the Y axis
int bValue = 0 ; // value of the button reading
void setup()
{
	Serial.begin(9600) ; // Open the serial port
	pinMode(8,INPUT) ; // Configure Pin 2 as input
	digitalWrite(8,HIGH);
}
void loop()
{
	// Read analog port values A0 and A1
	xValue = analogRead(A0);
	yValue = analogRead(A1);
	// Read the logic value on pin 2
	bValue = digitalRead(8);
	// We display our data separated by a comma
	Serial.print(xValue,DEC);
	Serial.print(",");
	Serial.print(yValue,DEC);
	Serial.print(",");
	Serial.print(!bValue);
	// We end with a newline character to facilitate subsequent analysis
	Serial.print("n");
	// Small delay before the next measurement
	delay(10);
}
</code>After uploading the above code don’t unplug the Arduino from the serial port in order to enable communication with the Processing IDE.
int x; // variable holding the value from A0
int y; // variable holding the value from A1
int b; // variable holding the value from digital pin 2
PFont f; // define the font variable
String portName;
String val;
void setup()
{
  size ( 512 , 512 ) ; // window size
  // we are opening the port
   myPort = new Serial(this, Serial.list()[0], 9600);
  myPort.bufferUntil('n');
  // choose the font and size
  f = createFont("Arial", 16, true); // Arial, 16px, anti-aliasing
  textFont ( f, 16 ) ; // size 16px
}
// drawing loop
void draw()
{
  fill(0) ; // set the fill color to black
  clear() ; // clean the screen
  fill(255) ; // set the fill color to white
  if (b == 1) // check if the button is pressed
  {
    // draw a larger circle with specified coordinates
    ellipse(x/2,y/2, 50, 50);
  }
  else
  {
    // we draw a circle with a certain coordinates
    ellipse(x/2,y/2, 25, 25);
  }
  // we display data
  text("AnalogX="+(1023-x)+" AnalogY="+(1023-y),10,20);
}
// data support from the serial port
void serialEvent( Serial myPort)
{
  // read the data until the newline n appears
  val = myPort.readStringUntil('n');
  if (val != null)
  {
        val = trim(val);
    // break up the decimal and new line reading
    int[] vals = int(splitTokens(val, ","));
    // we assign to variables
    x = vals[0];
    y = vals[1] ;
    b = vals[2];
  }
}Dual Axis Joystick with 8X8 Led Matrix.
We can now extend this concept further so that we can be able to map these values to a 8×8 led matrix. So that we can move a pixel with the joystick. You can also make reference on how to use the 8X8 led matrix here:

The connections for the Joystick and led matrix are done as shown below.

Code
The main idea in this code is the map() function which can be used to map the ranges as you wish. Also notice that the Y axis map is inverted!
int xValue = 0;
int yValue = 0; //Setting up controller//
#include "LedControl.h" //  need the library
LedControl lc=LedControl(8,10,9,1); //10 is to CLOCK, 9 = CS, 8=DIN//
void setup() {
  lc.shutdown(0,false);// turn off power saving, enables display
  lc.setIntensity(0,8);// sets brightness (0~15 possible values)
  lc.clearDisplay(0);// clear screen
}
void loop() {
  xValue = analogRead(A0);
  yValue = analogRead(A1);
  char x_translate = map(xValue, 1021, 0, 7, 0); //This maps the values//
  char y_translate = map(yValue, 1021, 0, 0, 7);
    // not in shutdown mode
    lc.clearDisplay(0);
    lc.setLed(0,x_translate,y_translate,true);
  delay(150); //adjust this delay to get your joystick correct//
}
