Integrating distance sensing with visual output is a fundamental building block for robotics, obstacle-avoidance systems, and real-time monitoring devices. In this guide, you will learn how to connect an HC-SR04 ultrasonic sensor and a 0.91″ I2C OLED display (SSD1306) to an Arduino Nano.
This tutorial covers the hardware connections, pinout mappings, software library setup, and complete Arduino code to display real-time distance measurements.
1. Components Required
- Arduino Nano (V3.0 recommended)
- HC-SR04 Ultrasonic Sensor
- 0.91″ I2C OLED Display (128×32, SSD1306 driver)
- Breadboard & Jumper Wires
- USB-A to Mini-B Cable (for power and programming)
2. Wiring & Pinout Breakdown
The circuit utilizes standard I2C communication for the display and standard digital I/O pins for the ultrasonic sensor trigger and echo signals.
Ultrasonic Sensor (HC-SR04) to Arduino Nano
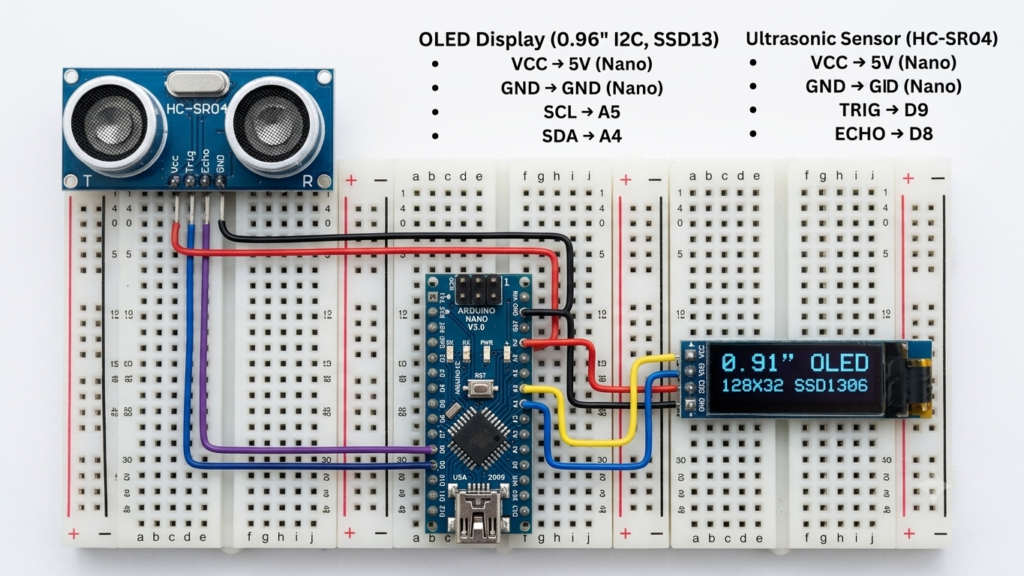
| HC-SR04 Pin | Arduino Nano Pin | Wire Color (in Diagram) | Description |
| VCC | 5V | Red | 5V Power Supply |
| GND | GND | Black | System Ground |
| TRIG | D9 | Purple | Trigger signal output from Nano |
| ECHO | D8 | Blue | Echo return signal input to Nano |
OLED Display (0.91″ SSD1306 I2C) to Arduino Nano
| OLED Pin | Arduino Nano Pin | Wire Color (in Diagram) | Description |
| VCC | 5V | Red | 5V Power Supply |
| GND | GND | Black | System Ground |
| SCL | A5 | Yellow | I2C Clock Line |
| SDA | A4 | Blue | I2C Data Line |
3. Library Installation
Before compiling the code, ensure you have installed the required libraries in the Arduino IDE:
- Open Arduino IDE.
- Go to Sketch > Include Library > Manage Libraries…
- Search for and install:
Adafruit SSD1306Adafruit GFX Library
4. Complete Arduino Code
Below is the clean code to measure distance in centimeters and update the OLED display continuously.
C++
#include <Wire.h>
#include <Adafruit_GFX.h>
#include <Adafruit_SSD1306.h>

// OLED display width and height
#define SCREEN_WIDTH 128
#define SCREEN_HEIGHT 32

// Declaration for SSD1306 display connected using I2C (SDA, SCL pins)
#define OLED_RESET -1 // Reset pin # (or -1 if sharing Arduino reset pin)
Adafruit_SSD1306 display(SCREEN_WIDTH, SCREEN_HEIGHT, &Wire, OLED_RESET);

// Define Ultrasonic Sensor Pins
const int trigPin = 9;
const int echoPin = 8;

// Variables for measurement
long duration;
int distanceCm;

void setup() {
  // Initialize Serial Monitor
  Serial.begin(9600);

  // Define pin modes
  pinMode(trigPin, OUTPUT);
  pinMode(echoPin, INPUT);

  // Initialize OLED display with I2C address 0x3C
  if (!display.begin(SSD1306_SWITCHCAPVCC, 0x3C)) {
    Serial.println(F("SSD1306 allocation failed"));
    for (;;); // Don't proceed, loop forever
  }

  // Clear buffer and show splash screen
  display.clearDisplay();
  display.setTextSize(1);
  display.setTextColor(SSD1306_WHITE);
  display.setCursor(0, 0);
  display.println(F("Ultrasonic System"));
  display.println(F("Initializing..."));
  display.display();
  delay(1000);
}

void loop() {
  // Clear the trigger pin
  digitalWrite(trigPin, LOW);
  delayMicroseconds(2);

  // Send a 10-microsecond HIGH pulse to trigger
  digitalWrite(trigPin, HIGH);
  delayMicroseconds(10);
  digitalWrite(trigPin, LOW);

  // Read the echo pin (returns wave travel time in microseconds)
  duration = pulseIn(echoPin, HIGH);

  // Calculate distance in cm (Speed of sound = 343m/s or 0.0343 cm/us)
  distanceCm = duration * 0.0343 / 2;

  // Print results to Serial Monitor
  Serial.print("Distance: ");
  Serial.print(distanceCm);
  Serial.println(" cm");

  // Display results on 0.91" OLED
  display.clearDisplay();

  // Header text
  display.setTextSize(1);
  display.setCursor(0, 0);
  display.println(F("DISTANCE METER"));

  // Value display (larger font)
  display.setTextSize(2);
  display.setCursor(0, 14);
  display.print(distanceCm);
  display.setTextSize(1);
  display.print(" cm");

  display.display();

  // Short delay before next reading
  delay(200);
}5. Circuit Working Principle
- Triggering: The Arduino Nano sends a $10\,\mu\text{s}$ high pulse on pin D9 to the HC-SR04
TRIGpin. - Ultrasonic Transmission: The sensor emits an eight-cycle sonic burst at $40\,\text{kHz}$.
- Echo Signal: The
ECHOpin goes high for the duration it takes for the sound wave to travel to an object and bounce back to the receiver. - Distance Calculation: The Arduino uses
pulseIn(echoPin, HIGH)to measure time ($t$) in microseconds. Distance is derived using:$$\text{Distance (cm)} = \frac{\text{Time } (\mu\text{s}) \times 0.0343\,\text{cm/}\mu\text{s}}{2}$$ - Display Output: The computed distance value is formatted and rendered onto the 0.91″ monochrome OLED screen via I2C (
A4/A5).
Have questions or need to modify this setup for a specific project? Drop a comment below!