Smart RGB lamps cost real money, but the electronics are just three PWM channels and a web page. In this project an ESP32 hosts a page with an HTML color picker, tap any colour on your phone and the RGB LED fades to it instantly. Put the LED inside a frosted jar or under a paper lantern and you’ve a genuine mood lamp.
You’ll practise the ESP32’s modern LEDC API (ledcAttach / ledcWrite) and learn how an HTML <input type="color"> sends hex colours to a microcontroller.
Components Required
- ESP32 DevKit
- Common-cathode RGB LED (or 3 separate LEDs)
- 3 × 220Ω resistors
- Breadboard and jumper wires
- Frosted jar or diffuser (optional)
Circuit Diagram and Wiring
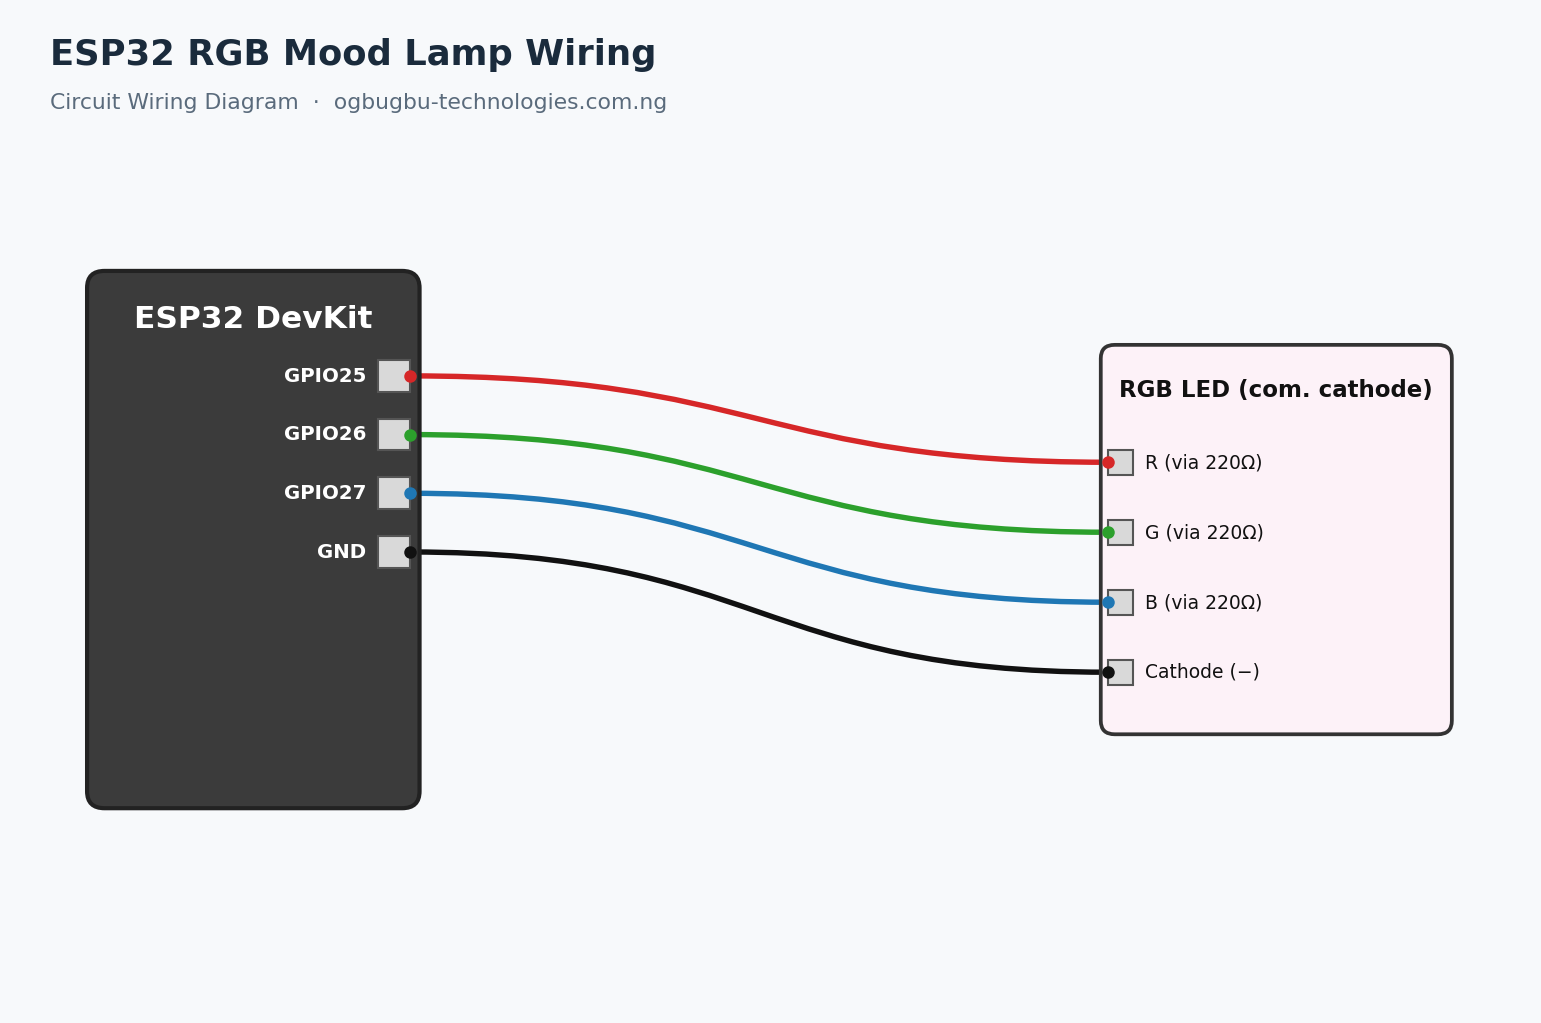
ESP32 PinComponent PinWire Color (diagram)GPIO25RGB red leg via 220ΩRedGPIO26RGB green leg via 220ΩGreenGPIO27RGB blue leg via 220ΩBlueGNDRGB cathodeBlack
The Code (Arduino IDE with ESP32 core)
/*
 * ESP32 Web RGB Mood Lamp
 * Ogbugbu Technologies - ogbugbu-technologies.com.ng/
 */
#include <WiFi.h>
#include <WebServer.h>

const char* WIFI_SSID = "YourWiFiName";       // <-- change
const char* WIFI_PASS = "YourWiFiPassword";   // <-- change

#define PIN_R 25
#define PIN_G 26
#define PIN_B 27

WebServer server(80);

void setColor(uint8_t r, uint8_t g, uint8_t b) {
  ledcWrite(PIN_R, r);
  ledcWrite(PIN_G, g);
  ledcWrite(PIN_B, b);
}

const char PAGE[] PROGMEM = R"rawliteral(
<!DOCTYPE html><html><head>
<meta name='viewport' content='width=device-width, initial-scale=1'>
<style>body{font-family:sans-serif;text-align:center;background:#111;color:#eee;padding:30px;}
input[type=color]{width:200px;height:120px;border:none;border-radius:12px;}</style>
</head><body>
<h1>Mood Lamp</h1>
<input type="color" id="c" value="#7c3aed" onchange="send()">
<script>
function send(){
  fetch('/set?hex=' + document.getElementById('c').value.substring(1));
}
</script></body></html>
)rawliteral";

void handleSet() {
  String hex = server.arg("hex");          // e.g. "ff8000"
  long v = strtol(hex.c_str(), NULL, 16);
  uint8_t r = (v >> 16) & 0xFF;
  uint8_t g = (v >> 8) & 0xFF;
  uint8_t b = v & 0xFF;
  setColor(r, g, b);
  Serial.printf("Color #%06Xn", v);
  server.send(200, "text/plain", "ok");
}

void setup() {
  Serial.begin(115200);
  ledcAttach(PIN_R, 5000, 8);   // pin, 5 kHz, 8-bit
  ledcAttach(PIN_G, 5000, 8);
  ledcAttach(PIN_B, 5000, 8);
  setColor(124, 58, 237);       // start purple

  WiFi.begin(WIFI_SSID, WIFI_PASS);
  while (WiFi.status() != WL_CONNECTED) delay(400);
  Serial.print("Lamp page: http://");
  Serial.println(WiFi.localIP());

  server.on("/", []() { server.send(200, "text/html", PAGE); });
  server.on("/set", handleSet);
  server.begin();
}

void loop() { server.handleClient(); }
How the Code Works
The web page uses the browser’s native color picker control, the ESP32 does no colour math at all. A tiny JavaScript fetch() call fires whenever you pick a colour, sending its hex code to the /set endpoint, where strtol() splits the hex value into red, green and blue bytes. No page reloads, so the lamp responds instantly.
On the LEDC side, each channel runs at 5 kHz with 8-bit resolution, giving 256 brightness steps per colour, 16.7 million possible combinations. ledcAttach() is the modern ESP32-core-3.x way to bind a pin to a PWM channel in one call. The lamp even boots into a pleasant purple so it works as ambient light before you ever open the page.
Testing and Troubleshooting
If one colour never lights, check that leg’s resistor and that your LED is common-cathode (longest leg to GND). If colours look swapped, your LED’s internal die order differs, just swap the GPIO numbers. Flickering on camera is normal for PWM; raise the frequency to 10 kHz if it bothers you in video. For a common-anode LED (long leg to 3V3), invert the values: ledcWrite(pin, 255 - v).
Conclusion
A web-controlled lamp is a gateway project: add preset buttons for sunset and ocean themes, a brightness slider, or sunrise alarm scheduling. The same code drives three MOSFET channels to run a full 12V RGB strip.
Found this tutorial helpful? Share it with a fellow maker and check out more builds on Ogbugbu Technologies!