The ESP32 hides a magic trick: ten of its GPIOs have built-in capacitive touch sensing, meaning a bare wire end becomes a touch button with zero extra components. In this playful project, six jumper wires become piano keys and a piezo buzzer plays the notes of a C-major scale. Touch a wire, hear a note.
Besides being genuinely fun, this is the cleanest way to learn touchRead(), tone generation with LEDC PWM, and threshold calibration, skills that also power touch lamps and hidden switches.
Components Required
- ESP32 DevKit
- 6 × male-to-male jumper wires (the bare ends are the keys)
- Piezo buzzer
- Breadboard
Circuit Diagram and Wiring
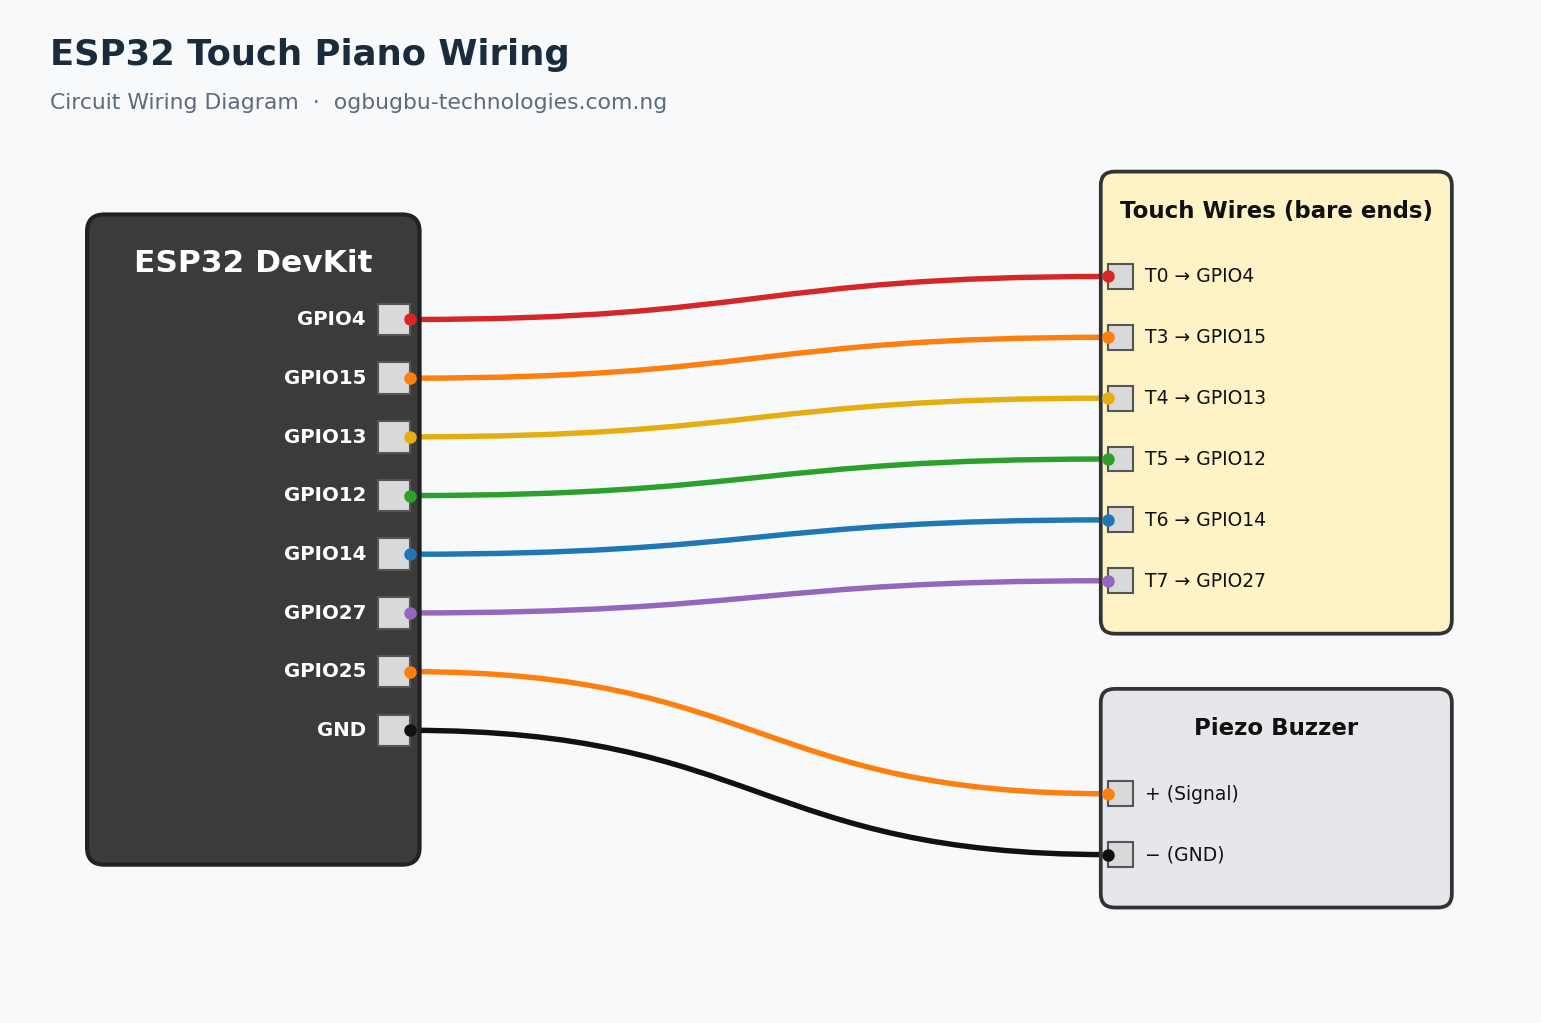
| GND | Buzzer | − | Black |
The Code (Arduino IDE with ESP32 core)
/*
 * ESP32 Capacitive Touch Piano
 * Ogbugbu Technologies - ogbugbu-technologies.com.ng/
 * No libraries needed - touch and LEDC are built into the ESP32 core
 */

struct Key { uint8_t pin; uint16_t freq; const char* name; };

// C major scale: C D E F G A
Key keys[] = {
  { 4, 262, "C" },   // T0
  { 15, 294, "D" },  // T3
  { 13, 330, "E" },  // T4
  { 12, 349, "F" },  // T5
  { 14, 392, "G" },  // T6
  { 27, 440, "A" },  // T7
};
const int NUM_KEYS = sizeof(keys) / sizeof(keys[0]);

#define BUZZER_PIN 25
int touchThreshold = 30;    // calibrate: untouched reads ~60-80, touched ~5-20

void setup() {
  Serial.begin(115200);
  ledcAttach(BUZZER_PIN, 2000, 8);   // pin, base freq, 8-bit resolution
  Serial.println("Touch piano ready. Raw values:");
}

void loop() {
  bool anyPressed = false;

  for (int i = 0; i < NUM_KEYS; i++) {
    int v = touchRead(keys[i].pin);
    if (v < touchThreshold) {
      Serial.printf("Key %s pressed (raw %d)n", keys[i].name, v);
      ledcWriteTone(BUZZER_PIN, keys[i].freq);
      anyPressed = true;
      break;                        // one note at a time
    }
  }

  if (!anyPressed) ledcWriteTone(BUZZER_PIN, 0);   // silence
  delay(30);
}

/* CALIBRATION: comment out the tone logic, open Serial Monitor and print
   touchRead() values with fingers off and on each wire. Set touchThreshold
   halfway between the two levels. */
How the Code Works
Capacitive touch works by measuring how long the pin’s parasitic capacitance takes to charge. Your finger adds capacitance, so a touched wire reads dramatically lower (often 5–20) than an untouched one (often 60–80). The sketch polls all six keys thirty times per second and plays the first one below the threshold.
Sound is produced by the ESP32’s LEDC peripheral, the same hardware that dims LEDs, here asked to generate a square wave at musical frequencies. ledcWriteTone() handles the frequency change, and setting the tone to 0 silences the buzzer when no key is touched. The note table maps each pin to its frequency in hertz; extend it to a full octave by adding B (494 Hz) and high C (523 Hz) on two more touch pins.
Testing and Troubleshooting
If keys trigger by themselves, your threshold is too high or a wire is touching the breadboard’s metal rails, print raw values and recalibrate. If nothing triggers, confirm you’re touching the metal tip, not the insulated plastic. Long wires act as antennas; keep them under 15 cm for reliable readings. Some ESP32 boards label the pins T0–T9 on the silkscreen.
Conclusion
You’ve built a musical instrument from scraps. Take it further: use foil pads taped to a table for bigger keys, record and playback a melody, or hide a touch key under a tabletop as a secret switch.
Found this tutorial helpful? Share it with a fellow maker and check out more builds on Ogbugbu Technologies!