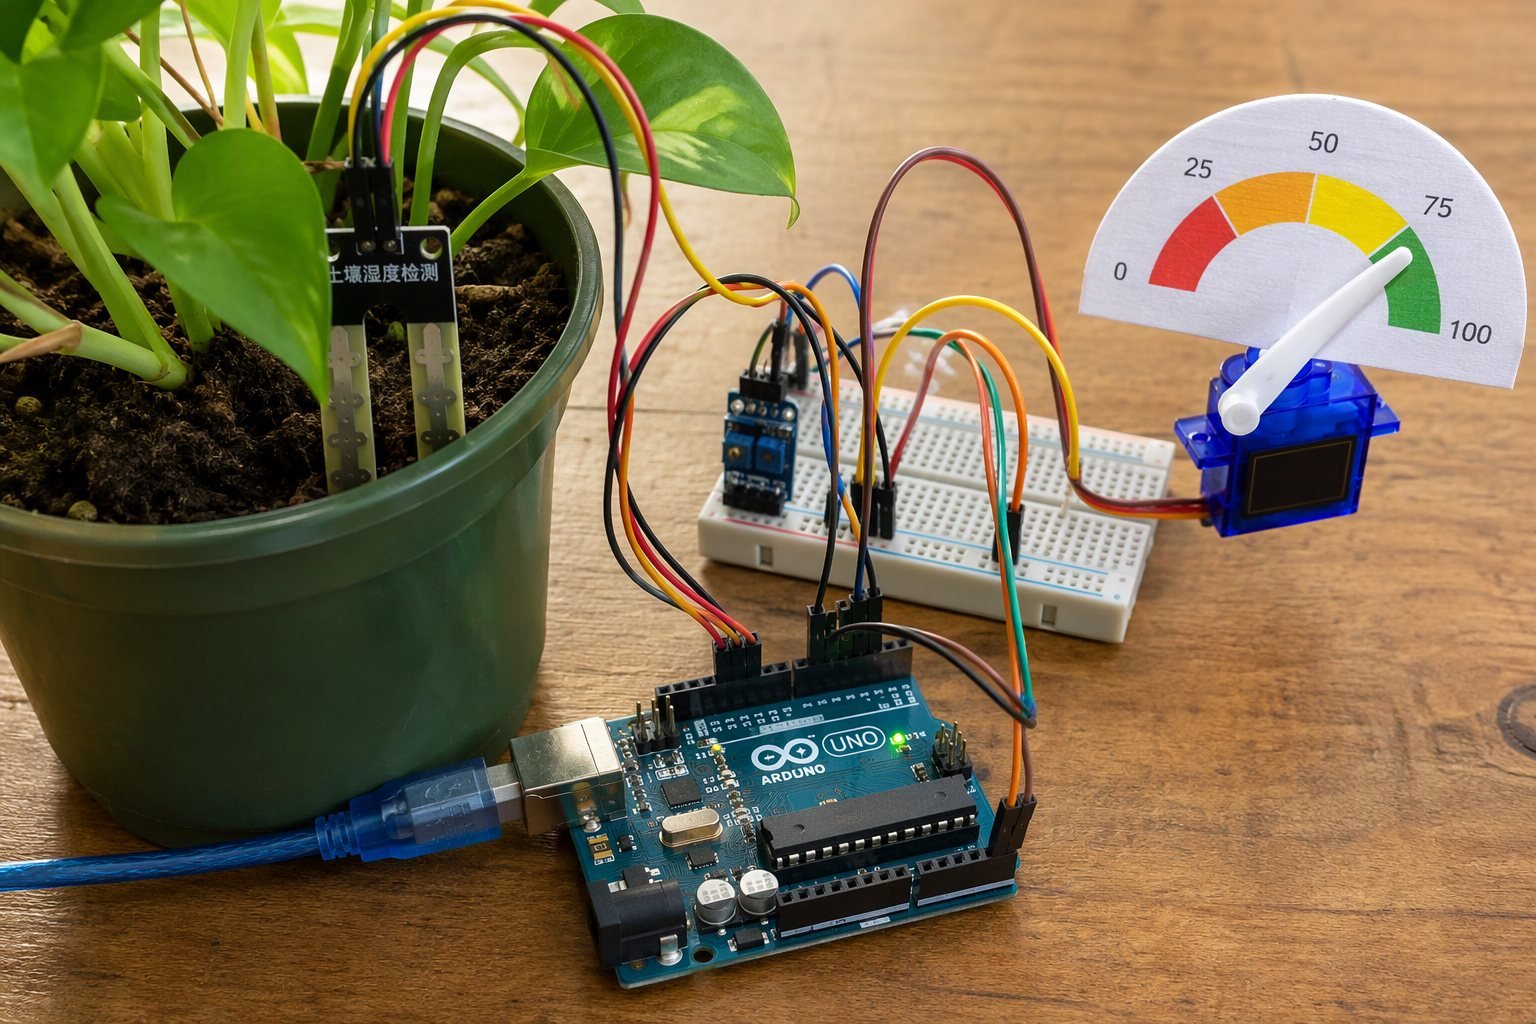

Overwatering kills more houseplants than neglect, and guessing is unreliable. This project turns an Arduino, a soil moisture sensor and an SG90 servo into a charming analog-style gauge: the servo horn sweeps from DRY to WET depending on the moisture level in the soil. It looks great on a desk and teaches analog reading and servo control in one build.
Because the cheap resistive probes corrode quickly when powered continuously, the sketch also shows a trick: we power the sensor from a digital pin and only switch it on while measuring, which dramatically extends the probe’s life.
Components Required
- Arduino Uno (or Nano)
- Soil moisture sensor with comparator module (analog output AO)
- SG90 micro servo
- Breadboard and jumper wires
- Printed or hand-drawn gauge scale (optional)
Circuit Diagram and Wiring
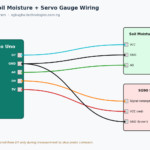
| Arduino Pin | Component Pin | Wire Color (diagram) |
|---|---|---|
| D7 | Sensor module VCC (powered only while measuring) | Teal |
| GND | Sensor module GND | Black |
| A0 | Sensor module AO | Green |
| D9 | Servo signal (orange wire) | Orange |
| 5V | Servo VCC (red wire) | Red |
| GND | Servo GND (brown wire) | Black |
The Code (Arduino IDE)
/*
 * Arduino Soil Moisture Monitor with Servo Gauge
 * Ogbugbu Technologies - ogbugbu-technologies.com.ng/
 * Library: Servo (built into the Arduino IDE)
 */
#include <Servo.h>

#define SENSOR_POWER 7   // sensor VCC is switched from this pin
#define SENSOR_PIN A0
#define SERVO_PIN 9

Servo gauge;

// Calibration: measure raw values in air (dry) and in wet soil
const int DRY_VALUE = 820;   // raw reading in dry air
const int WET_VALUE = 380;   // raw reading in just-watered soil

void setup() {
  Serial.begin(9600);
  pinMode(SENSOR_POWER, OUTPUT);
  digitalWrite(SENSOR_POWER, LOW);   // sensor off by default
  gauge.attach(SERVO_PIN);
  gauge.write(0);
}

int readMoistureRaw() {
  digitalWrite(SENSOR_POWER, HIGH);  // power the probe
  delay(200);                        // let it stabilise
  int raw = analogRead(SENSOR_PIN);
  digitalWrite(SENSOR_POWER, LOW);   // power off to slow corrosion
  return raw;
}

void loop() {
  int raw = readMoistureRaw();

  // Map raw reading to 0-100% (note: wet soil gives LOWER values)
  int percent = map(raw, DRY_VALUE, WET_VALUE, 0, 100);
  percent = constrain(percent, 0, 100);

  // Servo: 0 degrees = dry, 180 degrees = wet
  int angle = map(percent, 0, 100, 0, 180);
  gauge.write(angle);

  Serial.print("Raw: "); Serial.print(raw);
  Serial.print("  Moisture: "); Serial.print(percent); Serial.println("%");

  delay(10000);   // check every 10 seconds
}
How the Code Works
Capacitive and resistive soil probes output a higher analog voltage when the soil is dry and a lower voltage when it’s wet, so the mapping runs from DRY_VALUE down to WET_VALUE. You must calibrate these two constants for your own sensor: open the Serial Monitor, note the raw value in open air, then water the plant and note the new value.
The clever part is SENSOR_POWER: instead of wiring the probe’s VCC permanently to 5V, we feed it from pin D7 and only switch it on for 200 ms per measurement. Resistive probes corrode through electrolysis when powered constantly; this trick can extend the probe’s life from weeks to years. The constrain() call keeps the servo angle safe even if the sensor reads outside its calibrated range.
Testing and Troubleshooting
If the servo twitches but the needle never settles, the servo and sensor are fighting for the same 5V rail, give the servo its own supply or add a 470µF capacitor across 5V and GND. If the reading never changes, confirm you wired AO (analog out) and not DO (digital threshold out). If the gauge moves backwards, swap the 0 and 180 in the second map() call.
Conclusion
You now own a plant monitor with real personality. Ideas to extend it: light an LED when moisture drops below 30%, add a pump and relay for automatic watering, or build several gauges for a whole shelf of plants.
Found this tutorial helpful? Share it with a fellow maker and check out more builds on Ogbugbu Technologies!