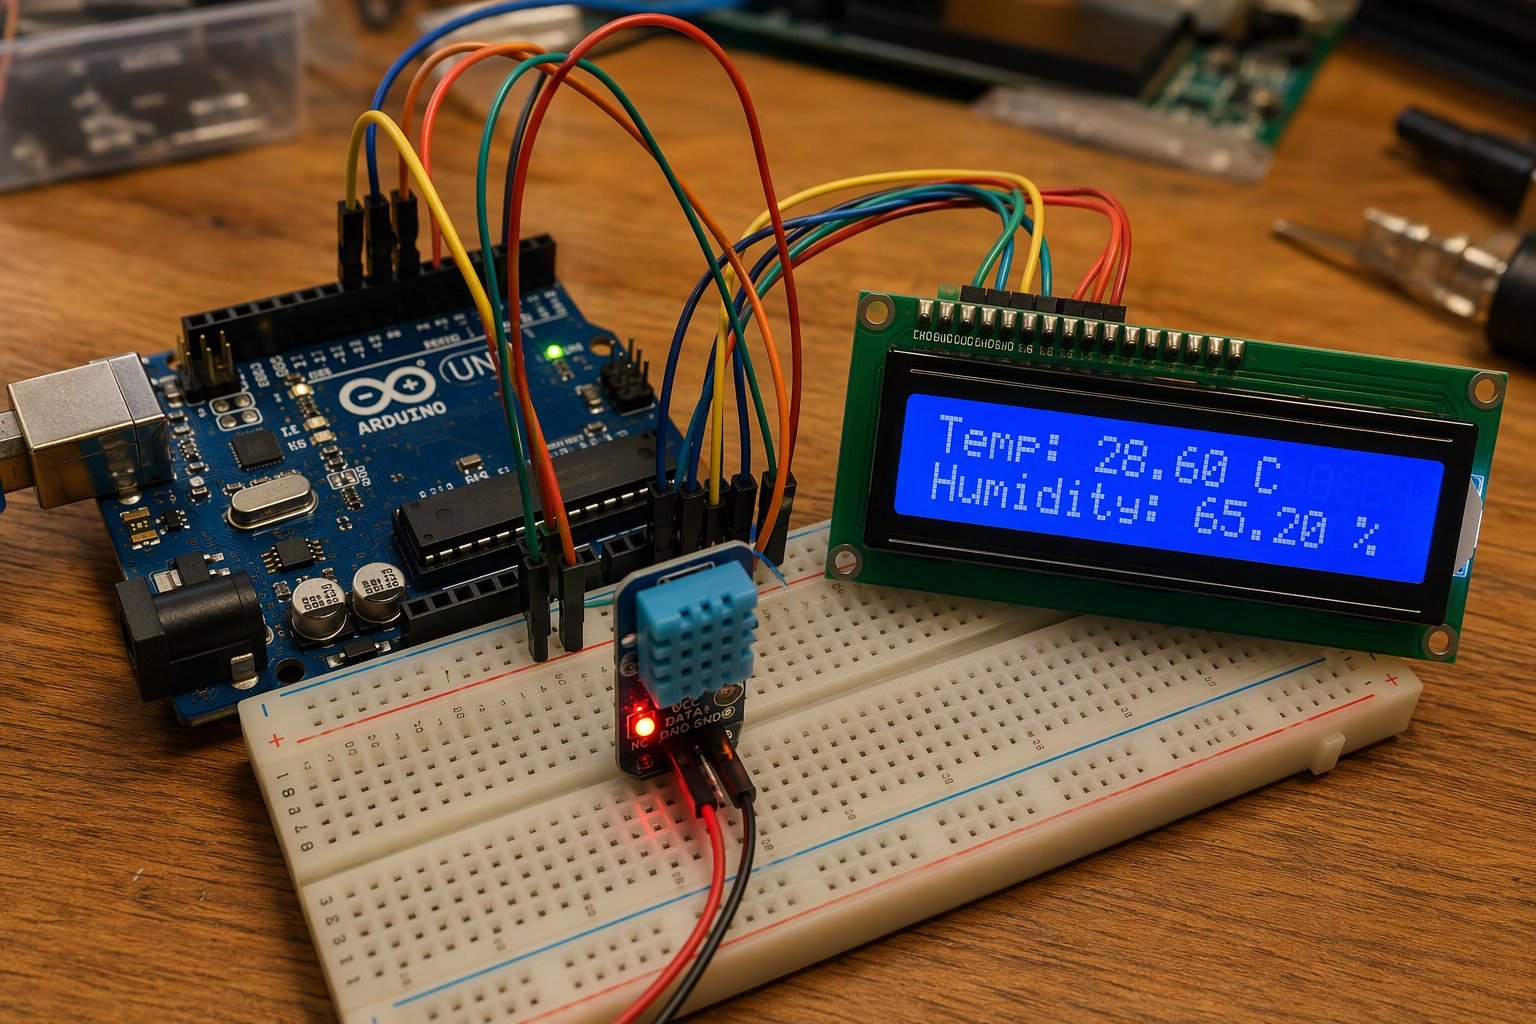
Reading the temperature and humidity of a room is one of the most satisfying first Arduino projects you can build, and it’s also the foundation of bigger systems such as weather stations, greenhouse controllers and home automation dashboards. In this tutorial you’ll wire a DHT11 digital temperature and humidity sensor to an Arduino Uno and display live readings on a 16×2 character LCD with an I2C backpack, so the whole display needs only two signal wires.
By the end of this guide you’ll have a working desktop thermometer-hygrometer, and you’ll understand how to use the DHT sensor library and the LiquidCrystal_I2C library, two building blocks you’ll reuse in many future projects.
Components Required
- Arduino Uno (or Nano) with USB cable
- DHT11 temperature & humidity sensor module (3-pin version with built-in pull-up)
- 16×2 LCD display with I2C backpack (PCF8574, address usually 0x27 or 0x3F)
- Breadboard and jumper wires
- 10k resistor (only if you use the raw 4-pin DHT11 sensor)
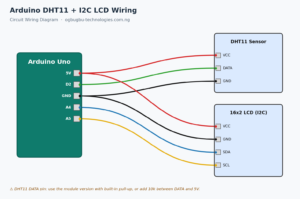
Circuit Diagram and Wiring

Arduino PinComponent PinWire Color (diagram)5VDHT11 VCCRedD2DHT11 DATAGreenGNDDHT11 GNDBlack5VLCD VCCRedGNDLCD GNDBlackA4LCD SDABlueA5LCD
| SCL | Yellow |
The Code (Arduino IDE)
/*
 * Arduino DHT11 + I2C LCD Temperature & Humidity Monitor
 * Ogbugbu Technologies - ogbugbu-technologies.com.ng/
 * Libraries: "DHT sensor library" by Adafruit, "LiquidCrystal_I2C" by Frank de Brabander
 */
#include <Wire.h>
#include <LiquidCrystal_I2C.h>
#include <DHT.h>

#define DHTPIN 2        // DHT11 DATA pin connected to D2
#define DHTTYPE DHT11

DHT dht(DHTPIN, DHTTYPE);
LiquidCrystal_I2C lcd(0x27, 16, 2);   // change to 0x3F if your screen stays blank

void setup() {
  Serial.begin(9600);
  dht.begin();
  lcd.init();
  lcd.backlight();
  lcd.setCursor(0, 0);
  lcd.print("Ogbugbu Tech");
  lcd.setCursor(0, 1);
  lcd.print("Starting...");
  delay(2000);
  lcd.clear();
}

void loop() {
  float humidity = dht.readHumidity();
  float tempC = dht.readTemperature();        // Celsius
  float tempF = dht.readTemperature(true);    // Fahrenheit

  if (isnan(humidity) || isnan(tempC)) {
    lcd.setCursor(0, 0);
    lcd.print("Sensor error! ");
    Serial.println("Failed to read from DHT11");
    delay(2000);
    return;
  }

  lcd.setCursor(0, 0);
  lcd.print("Temp: ");
  lcd.print(tempC, 1);
  lcd.print((char)223);   // degree symbol
  lcd.print("C ");

  lcd.setCursor(0, 1);
  lcd.print("Humidity: ");
  lcd.print(humidity, 1);
  lcd.print("% ");

  Serial.print(tempC); Serial.print(" C, ");
  Serial.print(humidity); Serial.println(" %");

  delay(2000);   // DHT11 needs at least 1-2 s between readings
}
How the Code Works
The sketch starts by including the Wire library (which handles I2C communication on pins A4 and A5), the LiquidCrystal_I2C library that drives the display, and the DHT library that decodes the single-wire protocol of the sensor. In setup() we initialise the sensor, turn the LCD backlight on and print a short splash screen.
In loop() the program reads humidity and temperature every two seconds. The DHT11 is a slow sensor, so polling it faster than once per second returns stale data; the two-second delay keeps readings fresh without errors. If the sensor returns NaN (not a number), the wiring or pull-up resistor is the usual suspect, so the sketch prints a clear error on the LCD instead of garbage. The (char)223 trick prints the degree symbol that’s built into the LCD character ROM.
Testing and Troubleshooting
Open the Serial Monitor at 9600 baud and you should see the same values that appear on the LCD. If the LCD lights up but shows nothing, the I2C address is probably wrong: upload an I2C scanner sketch and change 0x27 to the address it reports (commonly 0x3F). If the display shows faint boxes only, turn the contrast potentiometer on the I2C backpack. If you read Sensor error!, check that DATA is really on D2 and that your module has its pull-up resistor fitted (the raw 4-pin sensor needs a 10k resistor between DATA and 5V).
Conclusion
You now have a compact temperature and humidity monitor that costs just a few dollars. Natural next steps: log the readings to an SD card, add a buzzer that alarms above a set temperature, or port the project to an ESP32 to push the data to a web dashboard.
Found this tutorial helpful? Share it with a fellow maker and check out more builds on Ogbugbu Technologies!