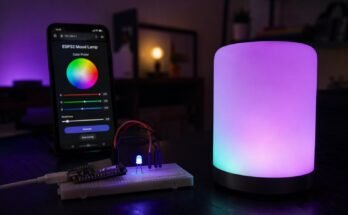
The ESP32’s superpower is Wi-Fi: any project you build can be controlled from a phone browser with no app at all. In this first ESP32 tutorial you’ll run a real web server on the board, connect it to your home Wi-Fi, and switch an LED on and off from a web page with two buttons. This is the “hello world” of the Internet of Things, and every later project in this ESP32 series builds on it.
You only need one LED and one resistor beyond the board itself, making this the cheapest possible entry into connected devices.
Components Required
- ESP32 DevKit (30-pin or 38-pin)
- LED (any colour)
- 220Ω resistor
- Breadboard and jumper wires
- A 2.4 GHz Wi-Fi network (ESP32 doesn’t support 5 GHz Wi-Fi)
Circuit Diagram and Wiring

The Code (Arduino IDE with ESP32 core)
/*
 * ESP32 Wi-Fi Web Server LED Control
 * Ogbugbu Technologies - ogbugbu-technologies.com.ng/
 * No extra libraries needed - WiFi and WebServer ship with the ESP32 core
 */
#include <WiFi.h>
#include <WebServer.h>

const char* WIFI_SSID = "YourWiFiName";       // <-- change
const char* WIFI_PASS = "YourWiFiPassword";   // <-- change

#define LED_PIN 23
bool ledOn = false;

WebServer server(80);

String page() {
  String html = "<!DOCTYPE html><html><head>";
  html += "<meta name='viewport' content='width=device-width, initial-scale=1'>";
  html += "<style>body{font-family:sans-serif;text-align:center;padding:40px;}"
          "button{font-size:24px;padding:16px 40px;margin:10px;border:none;"
          "border-radius:10px;color:#fff;} .on{background:#16a34a;} .off{background:#dc2626;}</style>";
  html += "</head><body><h1>Ogbugbu ESP32 LED</h1>";
  html += ledOn ? "<p>LED is <b>ON</b></p>" : "<p>LED is <b>OFF</b></p>";
  html += "<a href='/on'><button class='on'>TURN ON</button></a>";
  html += "<a href='/off'><button class='off'>TURN OFF</button></a>";
  html += "</body></html>";
  return html;
}

void handleRoot() { server.send(200, "text/html", page()); }
void handleOn()   { ledOn = true;  digitalWrite(LED_PIN, HIGH); server.sendHeader("Location","/"); server.send(303); }
void handleOff()  { ledOn = false; digitalWrite(LED_PIN, LOW);  server.sendHeader("Location","/"); server.send(303); }

void setup() {
  Serial.begin(115200);
  pinMode(LED_PIN, OUTPUT);
  digitalWrite(LED_PIN, LOW);

  WiFi.begin(WIFI_SSID, WIFI_PASS);
  Serial.print("Connecting");
  while (WiFi.status() != WL_CONNECTED) { delay(400); Serial.print("."); }
  Serial.println();
  Serial.print("Connected! Open this address: http://");
  Serial.println(WiFi.localIP());

  server.on("/", handleRoot);
  server.on("/on", handleOn);
  server.on("/off", handleOff);
  server.begin();
}

void loop() {
  server.handleClient();   // answers browser requests
}
How the Code Works
After Wi-Fi connects, the Serial Monitor prints the board’s IP address, that’s the only thing you need to type into your phone’s browser. The WebServer library maps URL paths to functions: visiting /on runs handleOn(), which sets the GPIO, then redirects the browser back to the main page with a 303 redirect so refreshing never re-triggers the action.
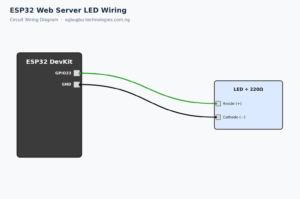
The HTML page is built as a plain string with inline CSS, big touch-friendly buttons that work on any phone. server.handleClient() must run continuously in loop(); it’s non-blocking, so you can still read sensors in the same loop. The LED wiring is the classic GPIO → 220Ω resistor → LED anode, cathode to GND arrangement.
Testing and Troubleshooting
If the board never connects, double-check SSID and password, and confirm your router is broadcasting 2.4 GHz, the ESP32 can’t see 5 GHz networks. If the page loads but the LED doesn’t change, verify GPIO23 with a multimeter (it should swing between 0 and 3.3V) and check LED polarity. If your phone says “site unreachable”, make sure the phone is on the same Wi-Fi network as the ESP32.
Conclusion
Congratulations, your first IoT device is online. Everything else in this series reuses this pattern: the next ESP32 post turns the same web server into a live temperature dashboard.
Found this tutorial helpful? Share it with a fellow maker and check out more builds on Ogbugbu Technologies!